Research Methods
Qualitative vs. Quantative
When I was completing my research my intention was to get equal amounts of Qualitative and Quantative, so I would have a good idea of the bigger picture of my research. The benefits of Quantative Research is that is it easy to identify patterns and cause/effect. I used Quantative Research during my studies into Depression in the Elderly because I wanted a clear idea of how many people were affected and the facts about how it begins and what the symptoms are. I also used Quantative Research when I looked at colour charts and colour association theories which made it clear to me the stereotypes which I could choose to adhere to or dispute in my film. The problems with Quantative Research is that it does not give you an idea of how specific people are affected by the statistics. It also can be hard to dissect or draw conclusions from, because it is so blunt and factual. It was good to use when I wanted an initial idea in research, but for more specific, individual research, I used Qualitative Research.
Good aspects of Qualitative Research are that it makes it easier to see different perspectives/subtle differences. My Qualitative Research into Colour Theory taught me the reason that people have a favourite colour, because it has an emotional or personal affect on them. This was very useful when casting my film, because I knew I needed to find actors who could portray the emotional connotations of the colours rather than what they directly represented. The only problems with Qualitative Research is that it can be incredibly biased depending on who you are talking to, and it cannot be generalised to a wide population of people.
Primary and Secondary
Two other methods of research which I undertook were Primary and Secondary.
My Primary Research involved much more direct contact with people and personal responses. My primary research was Qualitative and involved surveys and getting in contact with experts. I found Primary Research was definitely the most influential in relation to my project, but it was also much harder to gather. I sent off lots of emails which didn't get replies and the people I wanted to talk to were not always available. That is the main problem with Primary Research, it is much more difficult to get ahold of and there are lots of extraneous variables which may affect how much you get because it is reliant upon a person/company.
My Secondary Research was much more complex, and I did a lot of it. I researched everything from Colour Association theories to Avant-Guarde Filmmaking. I found that my secondary research gave me a much more detailed and broader view on what I wanted to create and inspired me when it came to styling my film. The secondary research I did gave me the knowledge I needed to execute my film successfully from beginning to end. However, it did have it's downside. Obviously the information was available to everyone, so it felt a lot less personal and also could be less reliable depending on the source. There were some sites that I went to which provided completely different information on my topics compared to other sites, and this made it hard to decipher the true information from the false.
Technical Design
Camera
The camera that I used for my film was the Canon 5D mark III. I decided to use this camera because it was the best one available in the University, and it was a camera my DOP was familiar with, so there would be no compatibility issues to slow down the shoot days. I was debating on hiring out a Black Magic Pocket Cinema Camera for an extra fee, but then I saw a comparison of both the cameras in a YouTube video online.
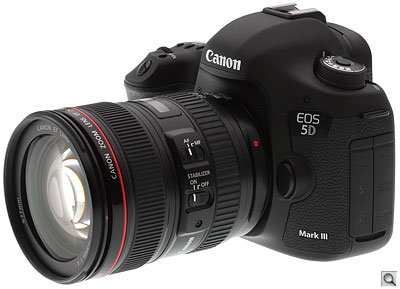
This video, plus other reviews I had read online, told me that the extra money I would be spending on the Black Magic would not be worth it because of what I wanted to film. I wasn't filming any action sequences, or in low light, or handheld, so the Canon 5D mark III would suit that perfectly.
Sound
I knew before I started filming that, due to the timing of my shoot days being so close to Christmas, I was going to have a very small crew. Because of this, I knew it was a possibility that I would have to be in charge of Sound during some of the Interview scenes as well as Directing.
The good thing about using Radio Mics rather than a Boom or Gun Mic is the specificity of the range. It meant that the only sound that would be picked up would be the actors voices, and that was essential in my scenes. The flip side of that is that they do not pick up any ambient sound, which would have been useful in post-production. Also they tend to run out of batteries very quickly, and if one fails then you completely lose the sound for that one actor. Some of my interviews involved giving two people mics, so this was a distinct risk. I just had to make sure I was monitoring it at all time so I could detect it fairly quickly if there was an issue.
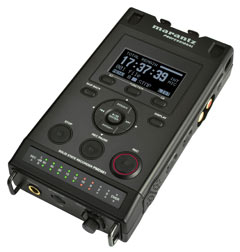
This was risky, and something I had wanted to avoid if I could, because I know how important Sound is and how easy it is to mess up if you are distracted. The last thing I wanted was to have to re-record anything. But unfortunately it was unavoidable, so I decided to use equipment I was familiar with. My scenes didn't require much movement, and the room was fairly quiet, so I decided to use Radio Mic's. This also meant that once I had attached them to the actors, all I would have to do is check the levels whilst filming every now and then to make sure they never peaked. I did this through a Marantz, a piece of equipment I had used several times in the past and was familiar with. I am not sure if I used the best sound equipment for the scenes I was shooting, but I did not want to risk learning to use something unfamiliar on the day, so I think I made the right choice.

Lighting
In the interview scenes, the space that I was lighting was very big. It had large windows which were unable to be blocked out, and house lights which acted on a sensor and could also not be deactivated. This meant that lighting the studio and keeping it consistent was fairly tricky. I tried to make it as easy as possible for my DOP by shooting at around the same time everyday, but the design of lights was one of the hardest jobs.
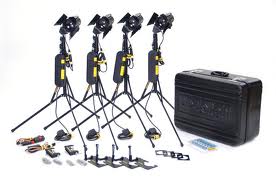
For the studio, I booked out Arri lights plus two sets of Dedo's and a Lishuai. I also booked out Dedoflex diffusers and daylight filters for if it got dark. I think that if I had not been prepared enough and this equipment wasn't available, it could have been near impossible to keep the lighting consistent, but we managed it.
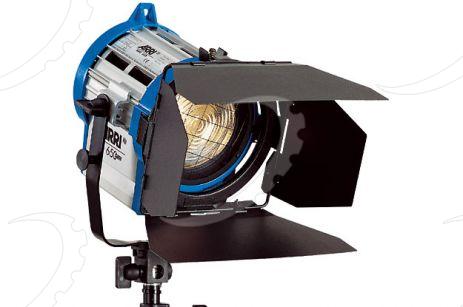
We used the Arri's in the corners of the room to bounce of the walls and the Dedo's to light the actors. The Lishuai was also very useful for getting rid of shadows. Because I wanted my lighting to be in shot occasionally to denote that we were in a proper studio, it was useful having this much around.
I don't think that I have any pro's and con's for the lighting I used, because there is nothing I could have used as extra to make it possibly better or worse. The only con's about using this much lighting is that if one bit had not been available on one day it would have been noticeable. Also using too much lighting could have the potential to 'wash' the actors out if they had been too close to their faces. However I think I overcame this in the colour grading process.
Editing
The editing software I used was Adobe Premiere Pro. I also used:
Adobe Photoshop- To make my poster/DVD trailer
Adobe Audition- To level my sound
Lumetri Looks
Magic Bullet
Film Specs
Frame Rate: 24fps
Shot in: H.264 8bit
16x9 1920 x 1080p
ISO: 640 (for most scenes)
Lenses used: 70-300mm, 16-35mm, 24-105mm